顯示具有 OS 標籤的文章。 顯示所有文章

2023年2月23日 星期四

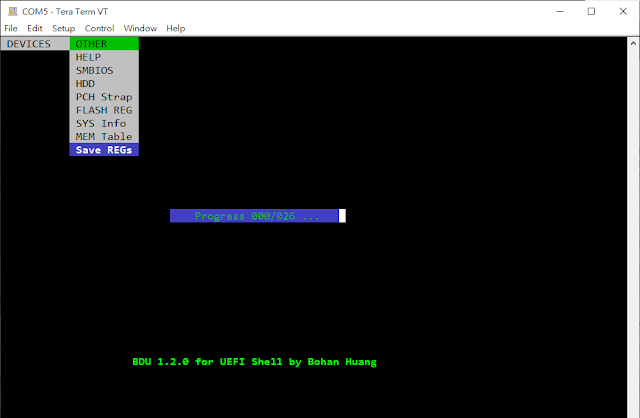
BDU v1.2.0 BIOS Debug Utility for UEFI Shell

BDU v1.2.0 supports the following new BIOS debug features :

1. Support Aspeed Super I/O
2. Support NcT5577D Super I/O
3. Dump full PCI scan registers including (similar to linux command lspci -vvv)
        a) PCI list
        b) PCI Express Capabilities (DevCap, DevCtl, LnkCap, and LnkSta)
        c) PCI Express Extended Capabilities
        d) PCI Configuration Space registers (256 or 4096 bytes)
        e) Byte Word DWord format
    and will auto generate REG_LIST.txt file
4. Fix exception for Intel Denverton chipset
5. Add Intel Purley chipset support
6. Add Intel Whitely chipset support
7. Add Intel Eagle Stream chipset support
8. Add progress bar when generating REG_LIST.txt


REG_LIST.txt include PCI List, each PCI/PCIE device register, specified memory, I/O space and ISA space.


Download bdux64.efi =>  BDUEFI_V_1_2_0.zip

BDU

Dump BootOrder

Dump SMBIOS

2018年5月11日 星期五

Dump BIOS Boot Order Tool in UEFI Shell

1. Download BOPx64.zip and extract zip file into your UEFI flash drive.

2. Execute the following command.

FS0:\> BOPx64.efi

Boot Order

2012年9月27日 星期四

如何開啟A20位址線 ?


image

image

image

image

Assembly code

In al, 0x92

Or al, 2

Out 0x92, al


Another way is to use the BIOS.

INT 15, 2401

mov ax, 0x2401

int 0x15

2011年9月28日 星期三

如何製作虛擬Floppy.img的GRUB開機介面

平台 : Ubuntu(Virtualbox)  Windows7

工具 : Bochs


1.開啟終端機,創立一個資料夾,並進入該資料夾


2.製作Floppy.img (兩者皆可)

# dd if=/dev/zero of=Floppy.img bs=1024 count=1440

# dd if=/dev/zero of=Floppy.img bs=512 count=2880


3.格式化Floppy.img

# mkdosfs Floppy.img


4.建立一個讓Floppy.img可以掛在的目錄 floppy

# mkdir floppy


5.掛載Floppy.img

# mount –o loop Floppy.img floppy


6.來這裡抓GRUB原始檔


7. 解壓縮(用0.96)

# tar zxvf grub-0.96-i386-pc.tar.gz


8.複製GRUB目錄

# sudo cp –r grub-0.96-i386-pc/* floppy


9.卸載floppy

# sudo umount floppy


10.安裝Grub

# sudo apt-get install grub


11.進入GRUB修改

# grub


12.輸入下列資訊

grub> device (fd0) floppy.img

grub> root (fd0)

grub> setup (fd0)

Checking if "/boot/grub/stage1" exists... yes

Checking if "/boot/grub/stage2" exists... yes

Checking if "/boot/grub/fat_stage1_5" exists... yes

Running "embed /boot/grub/fat_stage1_5 (fd0)"... failed (this is not fatal)

Running "embed /boot/grub/fat_stage1_5 (fd0)"... failed (this is not fatal)

Running "install /boot/grub/stage1 (fd0) /boot/grub/stage2 p /boot/grub/menu.lst "... succeeded

Done.

grub> quit


13.把檔案複製回Window7介面,開啟Bochs載入floppy.img 如圖設定

bochs設定

14.執行畫面

畫面1

畫面2

到此就告一段落


(1) 如果已經開發好作業系統者,做完第8個步驟後,加入menu.lst與kernel.elf於指定位址


kernel.elf (boot/kernel.elf)

menu.lst ( boot/grub/menu.lst )

title    DclabOS

root    (fd0)

kernel    /boot/kernel.elf

boot


(2)然後接著做步驟9之後的動作即可


畫面3

畫面4

畫面5

PS : 作業系統只輸出 Test Output to monitor. …


搞定收工 !