
2010年11月20日 星期六

如何在FreeBSD上安裝Apache+Php?
FreeBSD Version : 7.2
1.切換成 root 權限
# su
2.安裝 Apache
# cd /usr/ports/www/apache22
# make config (想要什麼功能在這裡選擇 Mysql記得勾選 方便日後升級)
# make
# make install (建議make install分開做)
成功安裝訊息
Your hostname must be resolvable using at least 1 mechanism in
/etc/nsswitch typically DNS or /etc/hosts or apache might
have issues starting depending on the modules you are using.
===> Installing rc.d startup script(s)
===> Compressing manual pages for apache-2.2.11_4
===> Running ldconfig
/sbin/ldconfig -m /usr/local/lib
===> Registering installation for apache-2.2.11_4
===> SECURITY REPORT:
This port has installed the following files which may act as network
servers and may therefore pose a remote security risk to the system.
/usr/local/lib/libapr-1.so.3
This port has installed the following startup scripts which may cause
these network services to be started at boot time.
/usr/local/etc/rc.d/apache22
/usr/local/etc/rc.d/htcacheclean
If there are vulnerabilities in these programs there may be a security
risk to the system. FreeBSD makes no guarantee about the security of
ports included in the Ports Collection. Please type 'make deinstall'
to deinstall the port if this is a concern.
For more information, and contact details about the security
status of this software, see the following webpage:
http://httpd.apache.org/
3.安裝 Php (php5 & php5-extension)
# cd /usr/ports/lang/php5
# make config (想要什麼功能在這裡選擇)
# make
# make install
成功安裝訊息
***************************************************************
Make sure index.php is part of your DirectoryIndex.
You should add the following to your Apache configuration file:
AddType application/x-httpd-php .php
AddType application/x-httpd-php-source .phps
***************************************************************
===> Compressing manual pages for php5-5.2.9
===> Registering installation for php5-5.2.9
===> SECURITY REPORT:
This port has installed the following files which may act as network
servers and may therefore pose a remote security risk to the system.
/usr/local/libexec/apache22/libphp5.so
/usr/local/bin/php
/usr/local/bin/php-cgi
If there are vulnerabilities in these programs there may be a security
risk to the system. FreeBSD makes no guarantee about the security of
ports included in the Ports Collection. Please type 'make deinstall'
to deinstall the port if this is a concern.
For more information, and contact details about the security
status of this software, see the following webpage:
http://www.php.net/
# cd /usr/ports/lang/php5-extensions
# make config
# make
# make install
成功安裝訊息
===> Returning to build of php5-extensions-1.3
===> Configuring for php5-extensions-1.3
===> Installing for php5-extensions-1.3
===> php5-extensions-1.3 depends on file: /usr/local/include/php/main/php.h - found
===> php5-extensions-1.3 depends on file: /usr/local/lib/php/20060613/bz2.so - found
===> php5-extensions-1.3 depends on file: /usr/local/lib/php/20060613/ctype.so - found
===> php5-extensions-1.3 depends on file: /usr/local/lib/php/20060613/dom.so - found
===> php5-extensions-1.3 depends on file: /usr/local/lib/php/20060613/filter.so - found
===> php5-extensions-1.3 depends on file: /usr/local/lib/php/20060613/ftp.so - found
===> php5-extensions-1.3 depends on file: /usr/local/lib/php/20060613/hash.so - found
===> php5-extensions-1.3 depends on file: /usr/local/lib/php/20060613/iconv.so - found
===> php5-extensions-1.3 depends on file: /usr/local/lib/php/20060613/json.so - found
===> php5-extensions-1.3 depends on file: /usr/local/lib/php/20060613/mssql.so - found
===> php5-extensions-1.3 depends on file: /usr/local/lib/php/20060613/mysql.so - found
===> php5-extensions-1.3 depends on file: /usr/local/lib/php/20060613/mysqli.so - found
===> php5-extensions-1.3 depends on file: /usr/local/lib/php/20060613/ncurses.so - found
===> php5-extensions-1.3 depends on file: /usr/local/lib/php/20060613/odbc.so - found
===> php5-extensions-1.3 depends on file: /usr/local/lib/php/20060613/pcre.so - found
===> php5-extensions-1.3 depends on file: /usr/local/lib/php/20060613/pdo.so - found
===> php5-extensions-1.3 depends on file: /usr/local/lib/php/20060613/pdo_sqlite.so - found
===> php5-extensions-1.3 depends on file: /usr/local/lib/php/20060613/posix.so - found
===> php5-extensions-1.3 depends on file: /usr/local/lib/php/20060613/session.so - found
===> php5-extensions-1.3 depends on file: /usr/local/lib/php/20060613/simplexml.so - found
===> php5-extensions-1.3 depends on file: /usr/local/lib/php/20060613/snmp.so - found
===> php5-extensions-1.3 depends on file: /usr/local/lib/php/20060613/sockets.so - found
===> php5-extensions-1.3 depends on file: /usr/local/lib/php/20060613/spl.so - found
===> php5-extensions-1.3 depends on file: /usr/local/lib/php/20060613/sqlite.so - found
===> php5-extensions-1.3 depends on file: /usr/local/lib/php/20060613/tokenizer.so - found
===> php5-extensions-1.3 depends on file: /usr/local/lib/php/20060613/xml.so - found
===> php5-extensions-1.3 depends on file: /usr/local/lib/php/20060613/xmlreader.so - found
===> php5-extensions-1.3 depends on file: /usr/local/lib/php/20060613/xmlwriter.so - found
===> php5-extensions-1.3 depends on file: /usr/local/lib/php/20060613/zip.so - found
===> php5-extensions-1.3 depends on file: /usr/local/lib/php/20060613/zlib.so - found
===> Generating temporary packing list
===> Checking if lang/php5-extensions already installed
===> Registering installation for php5-extensions-1.3
4.Apache 基本設定
# vi /usr/local/etc/apache22/httpd.conf
<IfModule dir_module>
DirectoryIndex index.html index.php (為了支援php格式)
</IfModule>
DirectoryIndex index.html index.php (為了支援php格式)
</IfModule>
將下列兩列加到最後一行
AddType application/x-httpd-php .php
AddType application/x-httpd-php-source .phps
AddType application/x-httpd-php-source .phps
5.開機時啟動 Apache
# vi /etc/rc.conf
加入 apache22_enable=”YES”
6.測試畫面 (預設目錄在/usr/local/www/apache22/data/)

2010年10月30日 星期六
如何更換Ubuntu10.04登入畫面(GDM-Gnome Desktop Manager)
如何讓Ubuntu登入畫面不再是死板板的一成不變?
想與其他人與眾不同 ?
p.s. 過程中可能會出現 libdmx1錯誤 再輸入下列指令
# sudo apt-get install libdmx1 or (sudo apt-get isntall -f 修復)
7.設定gdm
# sudo gdmsetup
跳出視窗(之後加入或將資料夾解壓所至 /usr/share/gdm/theme/)

Mac風格

追殺Bill

想與其他人與眾不同 ?
1.移除 gdm-2.30
# sudo apt-get autoremove --purge gdm gdm-guest-session ubuntu-desktop
2.移除gdm.conf
# sudo rm /etc/init.d/gdm.conf3. 下載 gdm-2.20
4.安裝 (32位元)
# dpkg -i gdm-2.20_2.20.10-0ubuntu3_i386.deb 或是 直接點擊安裝p.s. 過程中可能會出現 libdmx1錯誤 再輸入下列指令
# sudo apt-get install libdmx1 or (sudo apt-get isntall -f 修復)
5.重開機
# reboot (root權限)6.下載不錯的gdm theme
gnome-look.org7.設定gdm
# sudo gdmsetup
跳出視窗(之後加入或將資料夾解壓所至 /usr/share/gdm/theme/)

8.重新登入後 (run in virtualbox)
Mac風格

追殺Bill

謝謝收看 !
2010年10月24日 星期日
如何在Ubuntu上編譯Android ?
平台: Ubutnu
Android: 2.1
1.用apt-get安裝下列套件
•git-core
•sun-java5-jdk
•bison
•flex
•gperf
•libsd1-dev
•libsd0-dev
•build-essential
•libncurses5-dev
•zlib1g-dev
•curl
•libx11-dev
2.建立資料夾
# mkdir ~/bin(名稱隨意)
3.安裝repo
# Curl http://android.git.kernel.org/repo > ~/bin/repo
4.指定eclair
# ~/bin/repo init –u git://android.git.kernel.org/platform –b
eclair
Android 1.5 (Cupcake): Kernel 2.6.27
Android 1.6 (Donut): Kernel 2.6.29
Android 2.0/2.1 (Eclair): Kernel 2.6.29
Android 2.2 (Froyo): Kernel 2.6.32
5.更新(1.5hr~2hr)
# repo sync
6.編譯(1.5hr~2hr:雙核)
# make -j 2
7.模擬器上執行畫面

2010年10月22日 星期五
嵌入式系統開發之道 菜鳥成長日誌與專案經理的私房菜

這本書真的不錯,未來想從事相關產業的一定要買來讀讀。
2010年10月21日 星期四
如何編譯U-boot
1.先到SourceForge下載U-boot
2.解壓縮
$ tar jxvf u-boot-1.1.6.tar.bz2 3.看Makefile 有無自己的config
$vim Makefile 1870 sbc2410x_config: unconfig
1871 @$(MKCONFIG) $(@:_config=) arm arm920t sbc2410x NULL s3c24x0
1872
1873 scb9328_config : unconfig
1874 @$(MKCONFIG) $(@:_config=) arm arm920t scb9328 NULL imx
1875
1876 smdk2400_config : unconfig
1877 @$(MKCONFIG) $(@:_config=) arm arm920t smdk2400 NULL s3c24x0
1878
1879 smdk2410_config : unconfig
1880 @$(MKCONFIG) $(@:_config=) arm arm920t smdk2410 NULL s3c24x0
1881
1882 SX1_config : unconfig
1883 @$(MKCONFIG) $(@:_config=) arm arm925t sx1
4.建立config.mk
$ make smdk2410_config
Configuring for smdk2410 board...
5.設定CROSS_COMPILE 路徑
$ vim Makfile127 ifeq ($(ARCH),arm)
128 CROSS_COMPILE = arm-linux-
127 ifeq ($(ARCH),arm)
128 CROSS_COMPILE = YOURPATH/arm-linux-
5.Compile
$make.
.
.
/usr/local/arm/4.0.3/bin/arm-linux-objcopy --gap-fill=0xff -O srec u-boot u-boot.srec
/usr/local/arm/4.0.3/bin/arm-linux-objcopy --gap-fill=0xff -O binary u-boot u-boot.bin
完成後目錄下的u-boot.bin就是編譯好的bootloader
2010年10月14日 星期四
如何編譯 X-Loader ?
步驟一
下載x-loader http://git.igep.es/ 解壓縮
還 有到這裡下載toolchain 之後解壓到你的路徑
http://www.codesourcery.com/sgpp/lite/arm
步驟二
#make omap3530beagle_config
出現
rm -f include/config.h include/config.mk
Configuring for omap3devkit8000 board...
步驟三
#vim Makefile
修改
55 ifndef CROSS_COMPILE
56 CROSS_COMPILE = arm-none-linux-gnueabi-
57 #CROSS_COMPILE = arm-linux-
58 export CROSS_COMPILE
59 endif
成為
55 ifndef CROSS_COMPILE
56 CROSS_COMPILE = /{your path}/arm-none-linux-gnueabi-
57 #CROSS_COMPILE = arm-linux-
58 export CROSS_COMPILE
59 endif
步驟四
#make
reference:
http://focus.ti.com/general/docs/wtbu/wtbusplashcontent.tsp?templateId=6123&contentId=4750
https://gforge.ti.com/gf/project/bootloader/wiki/?pagename=X-Loader
2010年9月22日 星期三
.htaccess網頁認證 保護網頁目錄
作業系統 : Ubuntu 8.04LTS
1.編輯


3. 設定密碼
# htpasswd -c /var/www/.htpasswd bohan
4.畫面(Google瀏覽器)

1.編輯
# vim /etc/apache2/http.conf

將上述資料輸入進去存檔
/var/ww/webftp/ 為要保護的網頁目錄
2.新增.htaccess於/var/www/webftp/
# vim /var/www/webftp/.htaccess 
AuthName 為視窗的訊息
Authtype 認證模式
AuthUserFile 密碼檔的路徑(盡量別放在網頁目錄裡)
bohan 為使用者3. 設定密碼
# htpasswd -c /var/www/.htpasswd bohan
4.畫面(Google瀏覽器)

2010年9月6日 星期一
Rsync 指令參數
Rsync 可用於主機資料同步 也可以用於異地備份
使用方法,可以參考這裡
-h , --help 顯示rsync求助資訊.
--version 顯示rsync版本.
-v , --verbose 複雜的輸出訊息.
-q , --quiet 安靜模式,幾乎沒有訊息產生.常用在以cron執行rsync.
-I, --ignore-times 通常rsync為了加快速度會忽略同樣檔案大小且同樣存取時間點的檔案.
可以透過此參數關閉此快速檢查.
--size-only rsync只檢查檔案大小是否改變,不管時間存取點是否改變.
通常用在mirror,且對方時間不太正確時.
-c, --checksum 在傳送之前透過128bit的md4檢查碼來檢查所有要傳送的檔案.(會拖慢速度.)
-a, --archive archive mode 權限保存模式,相當於 -rlptgoD 參數.
很快速的保存幾乎所有的權限設定,除了硬式連結(透過-H設定).
-r, --recursive 複製所有下層的資料(遞迴)
-R, --relative 使用相對路徑.
如: rsync foo/bar/foo.c remote:/tmp/ 在遠端產生/tmp/foo.c檔案
rsync -R foo/bar/foo.c remote:/tmp/ 在遠端產生/tmp/foo/bar/foo.c 檔案
-R, --no-relative 不使用相對路徑.
-b, --backup 目的地端先前已經存在的檔案在傳輸或刪除前會被備份.
--backup-dir=DIR 設定備份的資料夾.
--suffix=SUFFIX 指定備份的檔案名稱字尾形式(預設為~).
-K, --keep-dirlinks 接收方將連結到資料夾的檔案視為資料夾處理
-l, --links 複製所有的連結
-H, --hard-links 保留硬式連結
-p, --perms 保留檔案權限
-o, --owner 保留檔案擁有者(root only)
-g, --group 保留檔案群組
-D, --devices 保留device資訊(root only)
-t, --times 保留時間點
-n, --dry-run 不實際執行傳送,只顯示將會有的傳輸動作
-S, --sparse 嘗試去處理稀疏的檔案,讓這些檔案在目的端佔去較少的磁碟空間.
-W, --whole-file 複製所有的檔案,不額外作檢查.
--no-whole-file 關閉 --whole-file 參數
-x, --one-file-system 不要跨越檔案系統分界(只在一個檔案系統處理)
-B, --block-size=SIZE 強制透過rsync程式去比對修復block-sizeforce
-e --rsh=COMMAND 定義所使用的remote shell
--rsync-path=PATH 定義rsync在遠端機器存放資料的路徑
--existing 只比對更新目的端已經存在的檔案
--ignore-existing 忽略目的端已經存在的檔案(也就是不更新)
--delete 刪除傳送端已經不存在,而目的端存在的檔案
--delete-excluded 除了把傳送端已經不存在,而目的端存在的檔案刪除之外,
也刪除 --exclude 參數所包含的檔案.
--delete-after rsync預設會在檔案傳送前進行相關刪除動作確保接收端有足夠的檔案空間,
但可以透過 --delete-after 讓刪除動作在檔案傳送後再行刪除.
--ignore-errors 忽略任何錯誤既使是I/O error 也進行 --delete 刪除動作.
--max-delete=NUM 定義rsync不要刪除超過 NUM 個檔案.
--partial rsync若遇到傳輸過程中斷時,會把那些已經傳輸的檔案刪除.
在某種狀況下保留那些部分傳送的檔案是令人高興的. 你可以透過 --partial 參數達到這個目的.
--partial-dir=DIR 在 --partial 參數啟動時,你還可以定義rsync把那些部分傳送的檔案
寫入定義的資料夾,而非直接寫入目的端.需要注意的是, 此資料夾不應該被其他使用者可以寫入.(如:/tmp)
--force 當目的端資料夾被傳送端非資料夾名稱覆蓋時,強制rsync刪除資料夾,
即使該資料夾不是空的.
--numeric-ids 不將傳送端檔案的uid及gid值,與目的端的使用者/群組進行配對.
若傳送端並沒有uid及gid的對應名稱(如:原帳號群組被刪除的遺留檔案),
或目的端沒有相對應的帳號/群組,保留數字型態的uid/gid
--timeout=TIMEOUT 設定 I/O 逾時的時間(秒). 超過這個秒數而沒有資料傳送,rsync將會結束.
預設為0,也就是沒有定義逾時時間.
-T, --temp-dir=DIR 定義rsync在接收端產生暫時性的複製檔案時使用資料夾暫存.
預設是直接在接收端資料夾直接產生暫存檔案.
--compare-dest=DIR 定義rsync在目的端建立資料夾來比對傳送過來的檔案.
--link-dest=DIR 與 --compare-dest 相同,但同時會針對無法改變的檔案建立硬式連結.
-z, --compress 壓縮模式,當資料在傳送到目的端進行檔案壓縮.
-P -P參數和 --partial --progress 相同.只是為了把參數簡單化.
-C, --cvs-exclude 排除那些通常不希望傳送的檔案.定義的方式與CVS傳送相同:
RCS SCCS CVS CVS.adm RCSLOG cvslog.* tags TAGS .make.state
.nse_depinfo *~ #* .#* ,* _$* *$ *.old *.bak *.BAK *.orig *.rej
.del-* *.a *.olb *.o *.obj *.so *.exe *.Z *.elc *.ln core .svn/
符合以上條件的都會被忽略而不傳送.
--exclude=PATTER 符合PATTERN(規則表示式)樣式的檔案不進行傳送
--exclude-from=FILE 和--exclude參數相同,不過是把不進行傳送的檔案事先寫入某一檔案.
執行時,透過此參數讓rsync讀取.
(; #開頭的行列或空白行會被rsync忽略)
--include=PATTERN 定義rsync不要排除符合pattern樣式的檔案.
--include-from=FILE 和--include參數相同,只不過把要包含的檔案寫到某一檔案.
--files-from=FILE 把要傳送的檔案名稱都精確的寫入某一檔案,讓rsync讀取.
如: rsync -a --files-from=/tmp/foo /usr remote:/backup
-0 --from0 定義檔案所要讀取的檔案是null字元結尾.
--version 顯示版本訊息.
--daemon 定義rsync以daemon型態執行.
--no-detach 當以daemon型態執行時,不要進行分裂且變成背景程序.
--address=ADDRESS 定義所要連結(bind)的ip位址或是host名稱(daemon限定)
--config=FILE 定義所要讀取的設定檔rsyncd.conf位置(daemon限定)
預設值為 /usr/local/etc/rsyncd.conf
--port=PORT 定義rsyncd(daemon)要執行的port(預設為tcp 873)
--blocking-io 使用blocking I/O連結遠端的shell,如rsh , remsh
--no-blocking-io 使用non-blocking連結遠端的shell,如ssh (預設值)
--stats 顯示檔案傳送時的資訊狀態
--progress 顯示傳送的進度.(給檔案傳送時,怕無聊的人用的..)
--log-format=FORMAT 定義log的格式(在rsyncd.conf設定)
--password-file=FILE 從檔案讀取與遠端rsync伺服器連結的密碼
--bwlimit=KBPS 定義傳輸頻寬的大小(KBytes/秒)
--write-batch=FILE 把紀錄資料寫入一個檔案(給其他相同環境且相同需求的機器使用)
--read-batch=FILE 透過讀取紀錄檔案來進行傳輸.(檔案由 --write-batch 參數產生)
--checksum-seed=NUM 定義檔案 checksum-seed 的大小(byte)
-4 --ipv4 使用IPv4協定
-6 --ipv6 使用IPv6協定
不習慣使用指令備份的話 網路上也有GUI介面的軟體
2010年8月3日 星期二
Ubuntu 裡重新設定MySQL root密碼
1.先停止MySQL
#/etc/init.d/mysql stop
2.輸入下列即可進入mysql# mysqld_safe --skip-grant-tables &
3. 換成root
#mysql -u root
4.出現mysql> 後輸入下列指令mysql> use mysql;
mysql> update user set password=PASSWORD("newpassword") where User='root';
mysql> flush privileges;
mysql> quit
mysql> update user set password=PASSWORD("newpassword") where User='root';
mysql> flush privileges;
mysql> quit
5.再啟動MySQL
#/etc/init.d/mysql start
2010年7月31日 星期六
Ubuntu如何用指令匯出MySQL 的資料庫?
開啟終端機輸入下列指令
如果要所有資料庫匯出
1.匯出某資料庫
# mysqldump -u root -p '密碼' 某資料庫名稱 > 輸出名稱.sql
或者是
# mysqldum p -u root -p 某資料庫名稱 > 輸出名稱.sql 按enter後再輸入mysql密碼如果要所有資料庫匯出
# mysqldump -u root -p '密碼' -A > 多個輸出名稱.sql
2. 匯入某資料庫
# mysql -u root -p 某資料庫名稱 < 輸出名稱.sql 或是 sql語法匯入多個
# mysql -u root -p -A < 多個輸出名稱.sql 參數眾多
請愛用 man mysqldump, man mysql
謝謝收看!!2010年7月26日 星期一
Ubuntu裡安裝joomla
首先開啟終端機 安裝以下套件
再到這裡下載所需套件 http://www.joomla.org.tw/download
解壓縮至/var/www/想要的名稱
開啟browser 輸入http://localhost/想要的名稱
這樣就可進入安裝步驟了
- apache2
- php5
- php5-mysql
- mysql-server
- mysql-client
- phpmyadmin
再到這裡下載所需套件 http://www.joomla.org.tw/download
解壓縮至/var/www/想要的名稱
開啟browser 輸入http://localhost/想要的名稱
這樣就可進入安裝步驟了
2010年7月19日 星期一
編譯內核時出現 "mkimage" command not found - U-Boot images will not be built
CHK include/linux/compile.h
Kernel: arch/arm/boot/Image is ready
Kernel: arch/arm/boot/zImage is ready
UIMAGE arch/arm/boot/uImage
"mkimage" command not found - U-Boot images will not be built
Image arch/arm/boot/uImage is ready
原因很簡單製作uImage的mkimage找不到
以至於uImage無法生成
解決辦法:到編譯U-Boot的資料夾裡 複製回mkimage就好
東西放在u-boot-1.3.3/tools/ (記得是編譯完U-Boot的資料夾 不然裡面是沒有mkimage)
ps:網路上也有人說放在/usr/bin裡 也有再加入另外加入$PATH 解決
Kernel: arch/arm/boot/Image is ready
Kernel: arch/arm/boot/zImage is ready
UIMAGE arch/arm/boot/uImage
"mkimage" command not found - U-Boot images will not be built
Image arch/arm/boot/uImage is ready
原因很簡單製作uImage的mkimage找不到
以至於uImage無法生成
解決辦法:到編譯U-Boot的資料夾裡 複製回mkimage就好
東西放在u-boot-1.3.3/tools/ (記得是編譯完U-Boot的資料夾 不然裡面是沒有mkimage)
cp mkimage /usr/local/arm/4.3.2/bin/
cp mkimage comiler資料夾/bin/
ps:網路上也有人說放在/usr/bin裡 也有再加入另外加入$PATH 解決
2010年7月13日 星期二
AF_INET和PF_INET的區別
在寫網路程式的時候,建立TCP socket一般是這樣的:
然後在綁定本地地址或連接遠程地址時需要初始化sockaddr_in結構,其中指定address family時一般設置為AF_INET,即使用IP。
問題是AF_INET和PF_INET到底有什麼區別,甚至很多參考書上都是混用。今 天查了一下相關頭文件的定義,找到了答案。
AF = Address Family
PF = Protocol Family
AF_INET = PF_INET
所以,理論上建立socket時是指定協議,應該用PF_xxxx,設置地址時應該用AF_xxxx。當然AF_INET和 PF_INET的值是相同的,混用也不會有太大的問題。
sock = socket(PF_INET, SOCK_STREAM, 0);
然後在綁定本地地址或連接遠程地址時需要初始化sockaddr_in結構,其中指定address family時一般設置為AF_INET,即使用IP。
問題是AF_INET和PF_INET到底有什麼區別,甚至很多參考書上都是混用。今 天查了一下相關頭文件的定義,找到了答案。
AF = Address Family
PF = Protocol Family
AF_INET = PF_INET
所以,理論上建立socket時是指定協議,應該用PF_xxxx,設置地址時應該用AF_xxxx。當然AF_INET和 PF_INET的值是相同的,混用也不會有太大的問題。
reference Andy Yang
2010年7月1日 星期四
Ubuntu SSH遠端安全連線安裝及設定以及scp指令用法
# sudo apt-get install openssh-server 就這麼簡單
如何連入遠端電腦?
linux下
# ssh username@ip
windows
請Google PieTTY 這套軟體
如何連入遠端電腦?
linux下
# ssh username@ip
windows
請Google PieTTY 這套軟體
scp用法
#scp filename username@ip:filename
#scp filename username@ip:filename
假設使用者allen要傳資料/home/allen/test.txt
到david桌面(ip:123.123.123.123) 指令可以這樣打
#scp /home/allen/test.txt david@123.123.123.123:/home/david/桌面/
#scp /home/allen/test.txt david@123.123.123.123:/home/david/桌面/
如果要抓回來 顛倒即可
#scp david@123.123.123.123:/home/david/桌面/test.txt /home/allenWindows 對 Linux
可以Google WinSCP這套軟體2010年6月25日 星期五
2010年5月13日 星期四
2010年4月30日 星期五


Ubuntu裡如何用指令查詢已安裝套件
在 Ubuntu 可以用下列指令找出指定的套件是不是已經安裝過了
dpkg --get-selections | grep 查詢的字串
也可以用這個指令來產生已安裝套件的清單檔
然後在開啟查詢
dpkg --get-selections | grep 查詢的字串
也可以用這個指令來產生已安裝套件的清單檔
dpkg --get-selections > output.txt
2010年4月14日 星期三
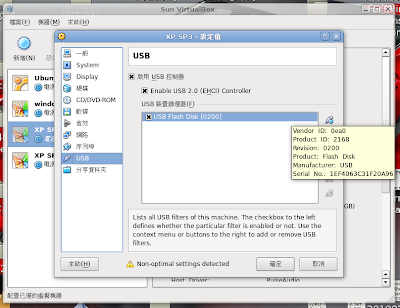
VirtualBox 使用USB裝置
之前有介紹過 VirtualBox 分享資料夾使用步驟
為什麼到今天才將 VirtualBox 使用USB裝置 給搞定呢??
經過指點 答案很簡單 我沒重開機 XD
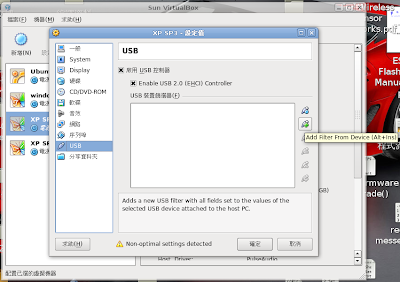
不囉唆 看圖! 步驟其實都大同小異
ps: 主機:Ubuntu 8.04 LTS VirtualBox:XP


為什麼到今天才將 VirtualBox 使用USB裝置 給搞定呢??
經過指點 答案很簡單 我沒重開機 XD
不囉唆 看圖! 步驟其實都大同小異
ps: 主機:Ubuntu 8.04 LTS VirtualBox:XP
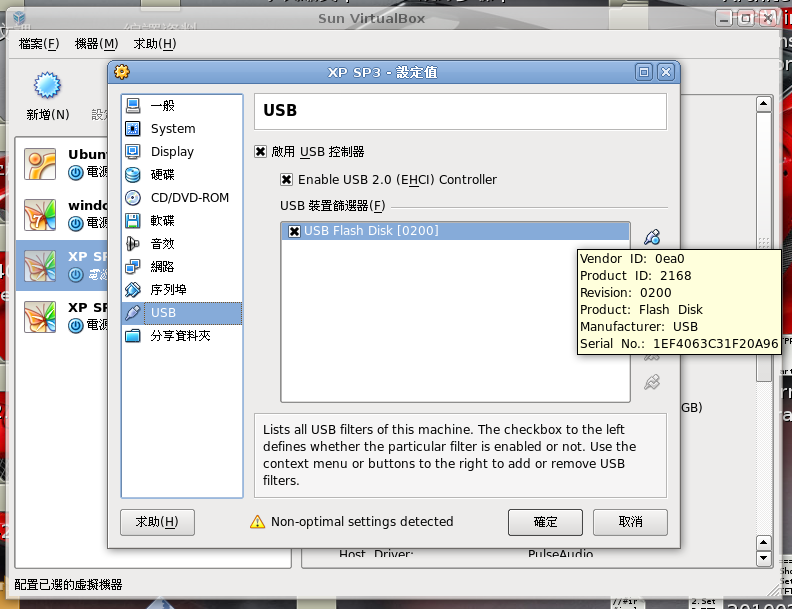


設定好記得重開主機
插入USB 看到USB圖示有閃 代表你成功了

XP也有看到該Flash memory
謝謝收看!!
2010年4月8日 星期四
2010年3月19日 星期五
ARM Assembler V.S GNU Assembler
ARM與GNU Assembler差異到底有多大,只能說非常的大!用過就知道,之前就將GNU 可成功Make的程式丟到ADS(他用的是ARM Assembler,自家開發的嘛)上模擬,看看中斷點、暫存器數值、程式流程。
錯誤居然有309個(組合語言部分,C語言倒是沒什麼問題)Google了ADS_Errors_and_Warnings、An Introduction to the GNU Assembler、GNU ARM Assembler Quick Reference以及網路上各方精華才知道,問題出在哪?還一直以為是環境設置的問題(當然環境設置也很重要,弄不好一樣不能跑!)。
ADS顯示的主要錯誤
1. Error : A1163E: Unknown opcode
組譯器擺明就是看不懂
2. Error : C2470E: function prototype formal '__packed__' needs type or class - 'int' assumed
這個__attribute__((__packed__))是GNU才有的用法 ARM Assembler也是看不懂的,記得Mark(註解)起來
其實真正的錯誤是下面這些(是非常多 XD)
ARM -> GNU
INCLUDE 替換成 .INCLUDE
TCLK2 EQU PB25 替換成 .equ TCLK2, PB25
EXPORT 替換成 .global
IMPORT 替換成 .extern
DCD 替換成 .long
IF :DEF: 替換成 .IFDEF
ELSE 替換成 .ELSE
ENDIF 替換成 .ENDIF
:OR: 替換成 |
:SHL: 替換成 <<
END 替換成 .end
TCLK2 EQU PB25 替換成 .equ TCLK2, PB25
EXPORT 替換成 .global
IMPORT 替換成 .extern
DCD 替換成 .long
IF :DEF: 替換成 .IFDEF
ELSE 替換成 .ELSE
ENDIF 替換成 .ENDIF
:OR: 替換成 |
:SHL: 替換成 <<
END 替換成 .end
AREA Word, CODE, READONLY --> .text
AREA Block, DATA, READWRITE --> .data
CODE32 --> .arm
CODE16 --> .thumb
LTORG --> .ltorg
AREA Block, DATA, READWRITE --> .data
CODE32 --> .arm
CODE16 --> .thumb
LTORG --> .ltorg
For ADS environment
__asm{
rsbs dumy, var2, 0
movmi L_var_out, L_var1, lsl var2
movpl L_var_out, L_var1, asr dumy
}
For GNU environment
__asm__ __volatile__(
" rsbs %0, %3, #0;\n\r"
" movmi %1, %2, lsl %3;\n\r"
" movpl %1, %2, asr %0"
:"=r" (dumy), "=r" (L_var_out)
:"r" (L_var1), "r" (var2)
);
or
asm volatile(
" rsbs %0, %3, #0;\n\r"
" movmi %1, %2, lsl %3;\n\r"
" movpl %1, %2, asr %0"
:"=r" (dumy), "=r" (L_var_out)
:"r" (L_var1), "r" (var2)
);
不知道的人,這部分可能弄個一輩子都不知道問題在哪?明明沒有錯看半天,上面只是主要的部分,其實還有很多想不到的,像是少加了個冒號、程式前面沒空白、有的地方必須是小寫,所有令人意想不到的錯誤都出現了。如果你很習慣GNU GDB(GNU DeBugger) 或是你根本就在Windows上開發一開始就是學ARM Assembler語法,那你就沒這個問題了,但如果你要將程式從GNU轉ARM或是倒過來ARM轉GNU記得先看看。
2010年3月9日 星期二
2010年3月8日 星期一
2010年3月3日 星期三
ADS AXD ICE 介紹
ADS (ARM Developer Suite)是ARM公司所開發的IDE (Integrated Development Environment)環境的程式編輯及編譯工具,能夠將程式編譯成為映射執行檔供AXD模擬執行,或是編譯成燒錄檔,燒錄至Flash開機執行。使用者使用ADS進行開發時,需要建立一個專案環境,並在專案環境下進行必要的硬體設定、編譯設定、檔案組態,以進行make、link等工作,結構如同使用armgcc編譯的組態與設定,但ADS已經此類工作在IDE環境下進行,使用者能夠輕鬆進行檔案組態與整理的工作。
ICE (In-Circuit Emulator)可將AXD連結上ARM Soc的JTAG介面的硬體已進行模擬執行及除錯,若是使用支援USB介面的ICE則需安裝USBmice2K.inf與USBmice.sys兩個USB驅動程式,並設定AXD的裝置使連結程序完成即可使用AXD模擬執行及除錯。
AXD (ARM eXtended Debugger)為一套debugger,是ARM公司所開發的IDE環境之模擬軟體,並提供模擬 執行、單步執行、記憶體及變數監控、設定中斷點及追蹤程式等偵錯功能,AXD需要透過ICE連結裝置的JTAG介面後才能執行,若是ICE位偵測到相符的硬體裝置,或是ICE驅動未在執 行狀態,執行AXD時將會出現錯誤。
2010年2月23日 星期二
圓剛還真是間不錯的公司
今天照舊瀏覽了mobile01看到了這篇
圓剛Diamond USB三頻電視棒+SnugTV架設網路電視台試玩分享
重點當然不是新的三頻電視棒而是後面的 SnugTV
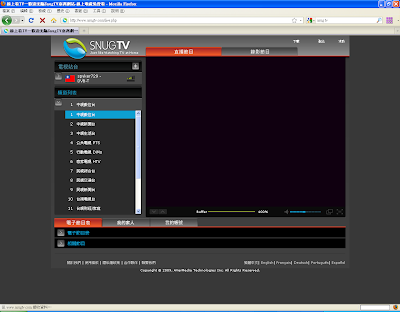
圓剛Diamond USB三頻電視棒+SnugTV架設網路電視台試玩分享
重點當然不是新的三頻電視棒而是後面的 SnugTV
去了網站看看想不到也有 三頻電視棒-HX A827
這款A827推出也有段時間了 圓剛還真是用心阿 !
就安裝看看 也不難沒花多少時間
這樣就有 自己的網路電視台了

因為串流 又不想拍照 所以看不到囉!
2010年2月20日 星期六
如何在Ubuntu下安裝更新版的OpenOffice
平台:Ubuntu 8.04.4 LTS
OpenOffice: 2.4
先移除OpenOffice 2.4 (不然會跟套件衝突)
sudo apt-get remove openoffice*
sudo apt-get autoremove
然後到這裡下載 http://download.openoffice.org/other.html
以OpenOffice 3.1.1(Linux 32-bit DEB)為例
下載後桌面出現
OOo_3.1.0_LinuxIntel_install_zh-tw_deb.tar.gz 檔案
解壓縮後進入
OOO310_m11_native_packed-4_zh-TW.9399 資料夾
接著進入DEBS資料夾(先切換root)
dpkg -i *.deb (為了方便 這裡是全部安裝 你也可以只挑你需要的)
之後在進入DEBS/desktop-integration
dpkg -i openoffice.org3.1-debian-menus_3.1-9393_all.deb (安裝應用程式捷徑)

搞定! 謝謝收看!
2010年2月11日 星期四
用Ubuntu9.10看數位電視(續)
之前用成功的http://spyker729.blogspot.com/2010/01/ubuntu910-hx.html
不過這次不同的地方是用筆電
不過卻因為晶片組的不同 搞得烏煙瘴氣
沒錯又是這個晶片INTEL ALC861 Analog
開啟kaffeine後
右上角出現了
結果找了超久 Link
必須安裝這兩個
不過這次不同的地方是用筆電
不過卻因為晶片組的不同 搞得烏煙瘴氣
沒錯又是這個晶片INTEL ALC861 Analog
開啟kaffeine後
右上角出現了
Phonon:KDE 的多媒體函式庫
音效裝置 HDA Intel (ALC861
Analog)無法運作. 改用default.
結果找了超久 Link
必須安裝這兩個
sudo apt-get install libxine1-
sudo apt-get install phonon-
終於看到影像和聽到聲音了 有夠累的
升級至Ubuntu 9.10 沒聲音?
想說今天有空將我的筆電升級至9.10好了
不想備份資料 就直接再終端機打 update-manager -d
沒想到更新完後 弄個數位電視
筆電之後就變成啞巴了
想說應該不難搞定吧Google一下就OK了
結果一弄就是快6個小時 還真他媽的機車!
還以為是沒更新好 結果指令看了一下 根本沒音效
Intel ALC861 Analog 這個有問題
最後參考到這篇
First, make sure that slmodemd is not running. with this command
pgrep slmodemd
restart your computer then go to System>Administration> Softwaresources>
In the Updates tab active "Unsupported Updates (karmic-backports), The reason from this is to install ALSA modules backports.
Now:
應該是2.6.31-19-generic沒支援ALC Analog861
要用舊的source
總算搞定!全身酸痛!
不想備份資料 就直接再終端機打 update-manager -d
沒想到更新完後 弄個數位電視
筆電之後就變成啞巴了
想說應該不難搞定吧Google一下就OK了
結果一弄就是快6個小時 還真他媽的機車!
還以為是沒更新好 結果指令看了一下 根本沒音效
Intel ALC861 Analog 這個有問題
bohan@bohan-laptop:~$ aplay -l
aplay: device_list:223: 找不到音效最後參考到這篇
First, make sure that slmodemd is not running. with this command
pgrep slmodemd
if the package installed remove with :sudo apt-get remove sl-modem-daemonrestart your computer then go to System>Administration> Softwaresources>
In the Updates tab active "Unsupported Updates (karmic-backports), The reason from this is to install ALSA modules backports.
Now:
sudo apt-get install linux-backports-modules-alsa-karmic-generic Add the PPA of Ubuntu Development Team Audio and updated to download and install their version of ALSA and PulseAudio packages. sudo add-apt-repository ppa:ubuntu-audio-devsudo apt-get update sudo apt-get dist-upgrade應該是2.6.31-19-generic沒支援ALC Analog861
要用舊的source
總算搞定!全身酸痛!
2010年2月9日 星期二
2010 Formula 1 車隊 車手 賽程

(今年最有希望奪冠的四大車隊 Mclaren,Mercedes GP,Red Bull,Ferrari)
其他都是...綠葉 XD

今年最熱門的話題史上最多冠軍的舒馬克(舒米) He is come back!
2010也是最多前冠軍車手的一年
現任Jenson Button
前任Lewis Hamilton
前前任Fernando Alonso
前前前任Michael Schumacher

今年的賽程表
繼中國 新加坡後
哇賽! 今年有韓國有也 (台灣勒?)
今年2010也是F1的60年(1950~2010)
今年肯定是戰況激烈阿!
訂閱:
文章 (Atom)