顯示具有 Server 標籤的文章。 顯示所有文章

2023年2月23日 星期四

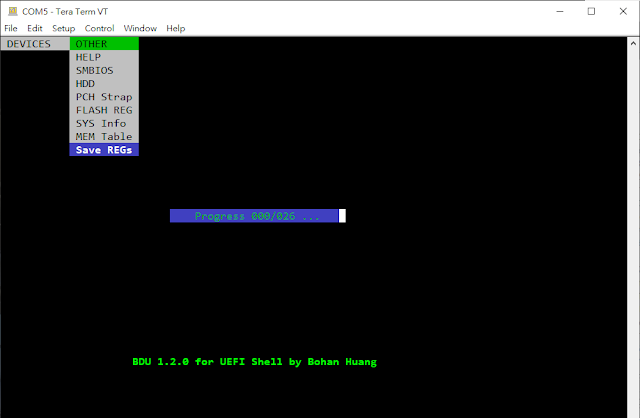
BDU v1.2.0 BIOS Debug Utility for UEFI Shell

BDU v1.2.0 supports the following new BIOS debug features :

1. Support Aspeed Super I/O
2. Support NcT5577D Super I/O
3. Dump full PCI scan registers including (similar to linux command lspci -vvv)
        a) PCI list
        b) PCI Express Capabilities (DevCap, DevCtl, LnkCap, and LnkSta)
        c) PCI Express Extended Capabilities
        d) PCI Configuration Space registers (256 or 4096 bytes)
        e) Byte Word DWord format
    and will auto generate REG_LIST.txt file
4. Fix exception for Intel Denverton chipset
5. Add Intel Purley chipset support
6. Add Intel Whitely chipset support
7. Add Intel Eagle Stream chipset support
8. Add progress bar when generating REG_LIST.txt


REG_LIST.txt include PCI List, each PCI/PCIE device register, specified memory, I/O space and ISA space.


Download bdux64.efi =>  BDUEFI_V_1_2_0.zip

BDU

Dump BootOrder

Dump SMBIOS

2015年2月13日 星期五

BDU v1.1.5 BIOS Utility for UEFI Shell

BDU v1.1.5 Supports the Following New Features :

1. Support Perpetual Calendar (萬年曆).

CMOS_0x0070_0x0071_000229_113725

CMOS_0x0070_0x0071_870729_000729

CMOS_0x0070_0x0071_141230_113320

2. Adjust the PCI Input Formats.

Bus: XXX (0-255) Dev: XX (0-31) Fun: X (0-7)

PCI Format

3. Fix Bus Section can't Enter 3 Digits.

4. Fix the Scan Algorithm For PCI List Function.

5. Add Century Prompt at CMOS (0x70/0x71).

Century

6. Fix the mmcfg_base Fetching Algorithm for Haswell and Broadwell Platform.

7. Add Qlogic, ASPEED and Broadwell PCI device name supports.

8. Remove the Auto-Refresh in PCI List, Menu, Help, SMBIOS, PCH Strap, and SYS Info to reduce the stress on Serial Port.

Download @ BDUEFI_V_1_1_5.zip
~ Thank you ~

2014年12月23日 星期二

BDU v1.1.4 BIOS Utility for UEFI Shell

BDU v1.1.4 supports the following features :


1. Support automatically generate a unique file name for every time of pressing F12 key to do screenshot capturing.


Format : FunctionName_YYMMDD_HHMMSS.bmp

iScreenshot_141223_101359


2. Support pop-up messages before BDU starts to capture a

screenshot.

PCI_B000_D031_F000_141223_101229Memory_0x000EDB70_141223_101240

IO_0x0000_141223_101247

CMOS_0x0070_0x0071_141223_101309ISA_0x0295_0x0296_141223_101313

Menu_141223_101318

Menu_141223_101320

Help_141223_101322

PCH_Straps_141223_101333

SIO_0x002E_0x002F_141223_101255

SIO_0x004E_0x004F_141223_101300

SIO_0x006E_0x006F_141223_101305

SystemInfo_141223_101336

PCI_LIST_141223_094720

PCI_LIST_141223_094725

PCI_LIST_141223_094727

3. File will be generated at your current folder, not root folder.

Ex : Current Folder : fs0:\BMP

=> File Place : fs0:\BMP\FunctionName_YYMMDD_HHMMSS.bmp


4. The default image size has changed from 800x600 to capture image depend on your current resolution.


Download @ BDUEFI_V_1_1_4.zip
~ Thank you ~

2014年12月17日 星期三

BDU v1.1.3 BIOS Utility for UEFI Shell

1. BDU v1.1.3 supports capturing a screenshot by pressing F12 key.

2. Fix input bug when pressing P key to configure address.


P.S. if you want to capture screen under UEFI shell. Please refer to here.


The following are the default file format :

iScreenshot (3)

Memory

PCI

IO

ISA

Help

Menu1

Menu

PCH_Straps

PCI_LIST

Download @ BDUEFI_V_1_1_3.zip
~ Thank you ~

2011年8月28日 星期日

Ubuntu上使用Dropbox

X86.tar.gz   X64.tar.gz   Deb or Rpm

最近Dropbox非常熱門,用來儲存文件非常方便,將來非常有可能取代隨身碟,而且適用於多種平台,特別是使用在手機上非常方便。

Deb或RPM安裝就不介紹了,點了就可以安裝,以下介紹的是用壓縮檔安裝。

1.開啟終端機 下載壓縮檔

$ wget http://www.dropbox.com/download/?plat=lnx.x86


2. 解壓縮同目錄 下載後的 tar.gz

$ tar zxvf dropbox-lnx.x86-1.1.43.tar.gz


3.執行同目錄下的 dropboxd

$ ./.dropbox-dist/dropboxd


4.出現下列訊息 並登入

Please visit https://www.dropbox.com/cli_link?host_id=f58c94b1bca468309bb218c04dc706ac&cl=en_US to link this machine.


5.終端機會出現 代表成功了...

Client successfully linked, Welcome Bohan!


註:預設Dropbox在使用者目錄下 ~/Dropbox,進去就可以看到目錄下有你的資料了。

2011年4月24日 星期日

如何在 Linux 架設 Samba 網路芳鄰分享檔案

Linux : Ubuntu、Ubuntu Server

Windows : Windows 7


1.安裝Samba

# sudo apt-get install samba


2.備份smb.conf

# cp /etc/samba/smb.conf /etc/samba/smb.conf-bak


3.新增使用者(有兩種)

使用舊的版本

# smbpasswd –a user

完成後密碼檔在/etc/samba/smbpasswd

smbpasswd –h 可以查看更多參數

使用新的版本

# pdbedit –a user

完成後可用pdbedit –L 看目前使用者

pdbedit –x 刪除使用者


4.編輯smb.conf

# vim /etc/samba/smb.conf


1 [global]

2 workgroup = BohanSamba

3 netbios name = BohanPC

4 security = user

5

6 [share]

7 path = /home/download/

8 valid users = download

9 read only = no

10 browseable = yes

11 create mask = 0755
12 directory mask = 0755


5.重新啟動samba(有兩種)

使用舊的版本

# /etc/init.d/samba restart

使用新的版本

# sudo service smbd restart

# sudo service nmbd restart


6. 輸入IP 帳號 密碼

\\ yourip

windows7samba

7.刪除連線

開啟命令提示字元輸入

net use * /delete

2011年3月23日 星期三

Ubuntu 使用 NO-IP

1.先去noip網站註冊

http://www.no-ip.com/


2.加入Host 對應

Noip


3.安裝noip套件

$ sudo apt-get install noip2

或者是到noip下載解壓縮 之後編譯安裝


4.安裝畫面如下


第一次安裝會跳出以下畫面

noipmail

noipassword

noiptime

noipgroup

noipdevice

noipfinish


5. 測試有沒有成功

connect

connectpaswd


noiptest

6. noip命令

USAGE: noip2 [ -C [ -F][ -Y][ -L hosts_groups][ -U #min]
        [ -u username][ -p password][ -x progname]]
        [ -c file][ -d][ -D pid][ -i addr][ -S][ -M][ -h]
Version Linux-2.1.7
Options: -C                         create configuration data
               -F                          force NAT off
               -Y                          select all hosts/groups
               -L hosts_groups  select supplied hosts/groups
               -U minutes           set update interval
               -u username        use supplied username
               -p password        use supplied password
               -x executable       use supplied executable
               -c config_file        use alternate data path
               -d                           increase debug verbosity
               -D processID       toggle debug flag for PID
               -i IPaddress         use supplied address
               -I interface            use supplied interface
              -S                           show configuration data
              -M                          permit multiple instances
              -K processID        terminate instance PID
              -z                           activate shm dump code
              -h                           help (this text)


重新設定的話輸入

$ noip2 –C


已經有設定資料的話先刪除 noip porcess

$ noip2 –K processID


顯示現在電腦設定

$ noip2 –S

謝謝收看!